用nodejs快速在Matataki发文
如何用nodejs快速在Matataki发文, 利用node爬虫来获取网页的内容然后转发到matataki上面
这里就自己的blog做一个简单的example 这是可能需要用的接口文档⬇️⬇️⬇️ (docsify真香)
开始
首先我们先初始一个项目
1
2
3
mkdir matataki-post
npm init -y
touch index.js理清思路
就像怎么把大象🐘装进冰箱一样 1…. 2… 3… 首先我们需要在matataki上面注册一个账号, 我选择了邮箱 因为很简单也很方便 注册也挺快的, 然后去发布一篇文章 看看接口是如何调用的
编辑
发布
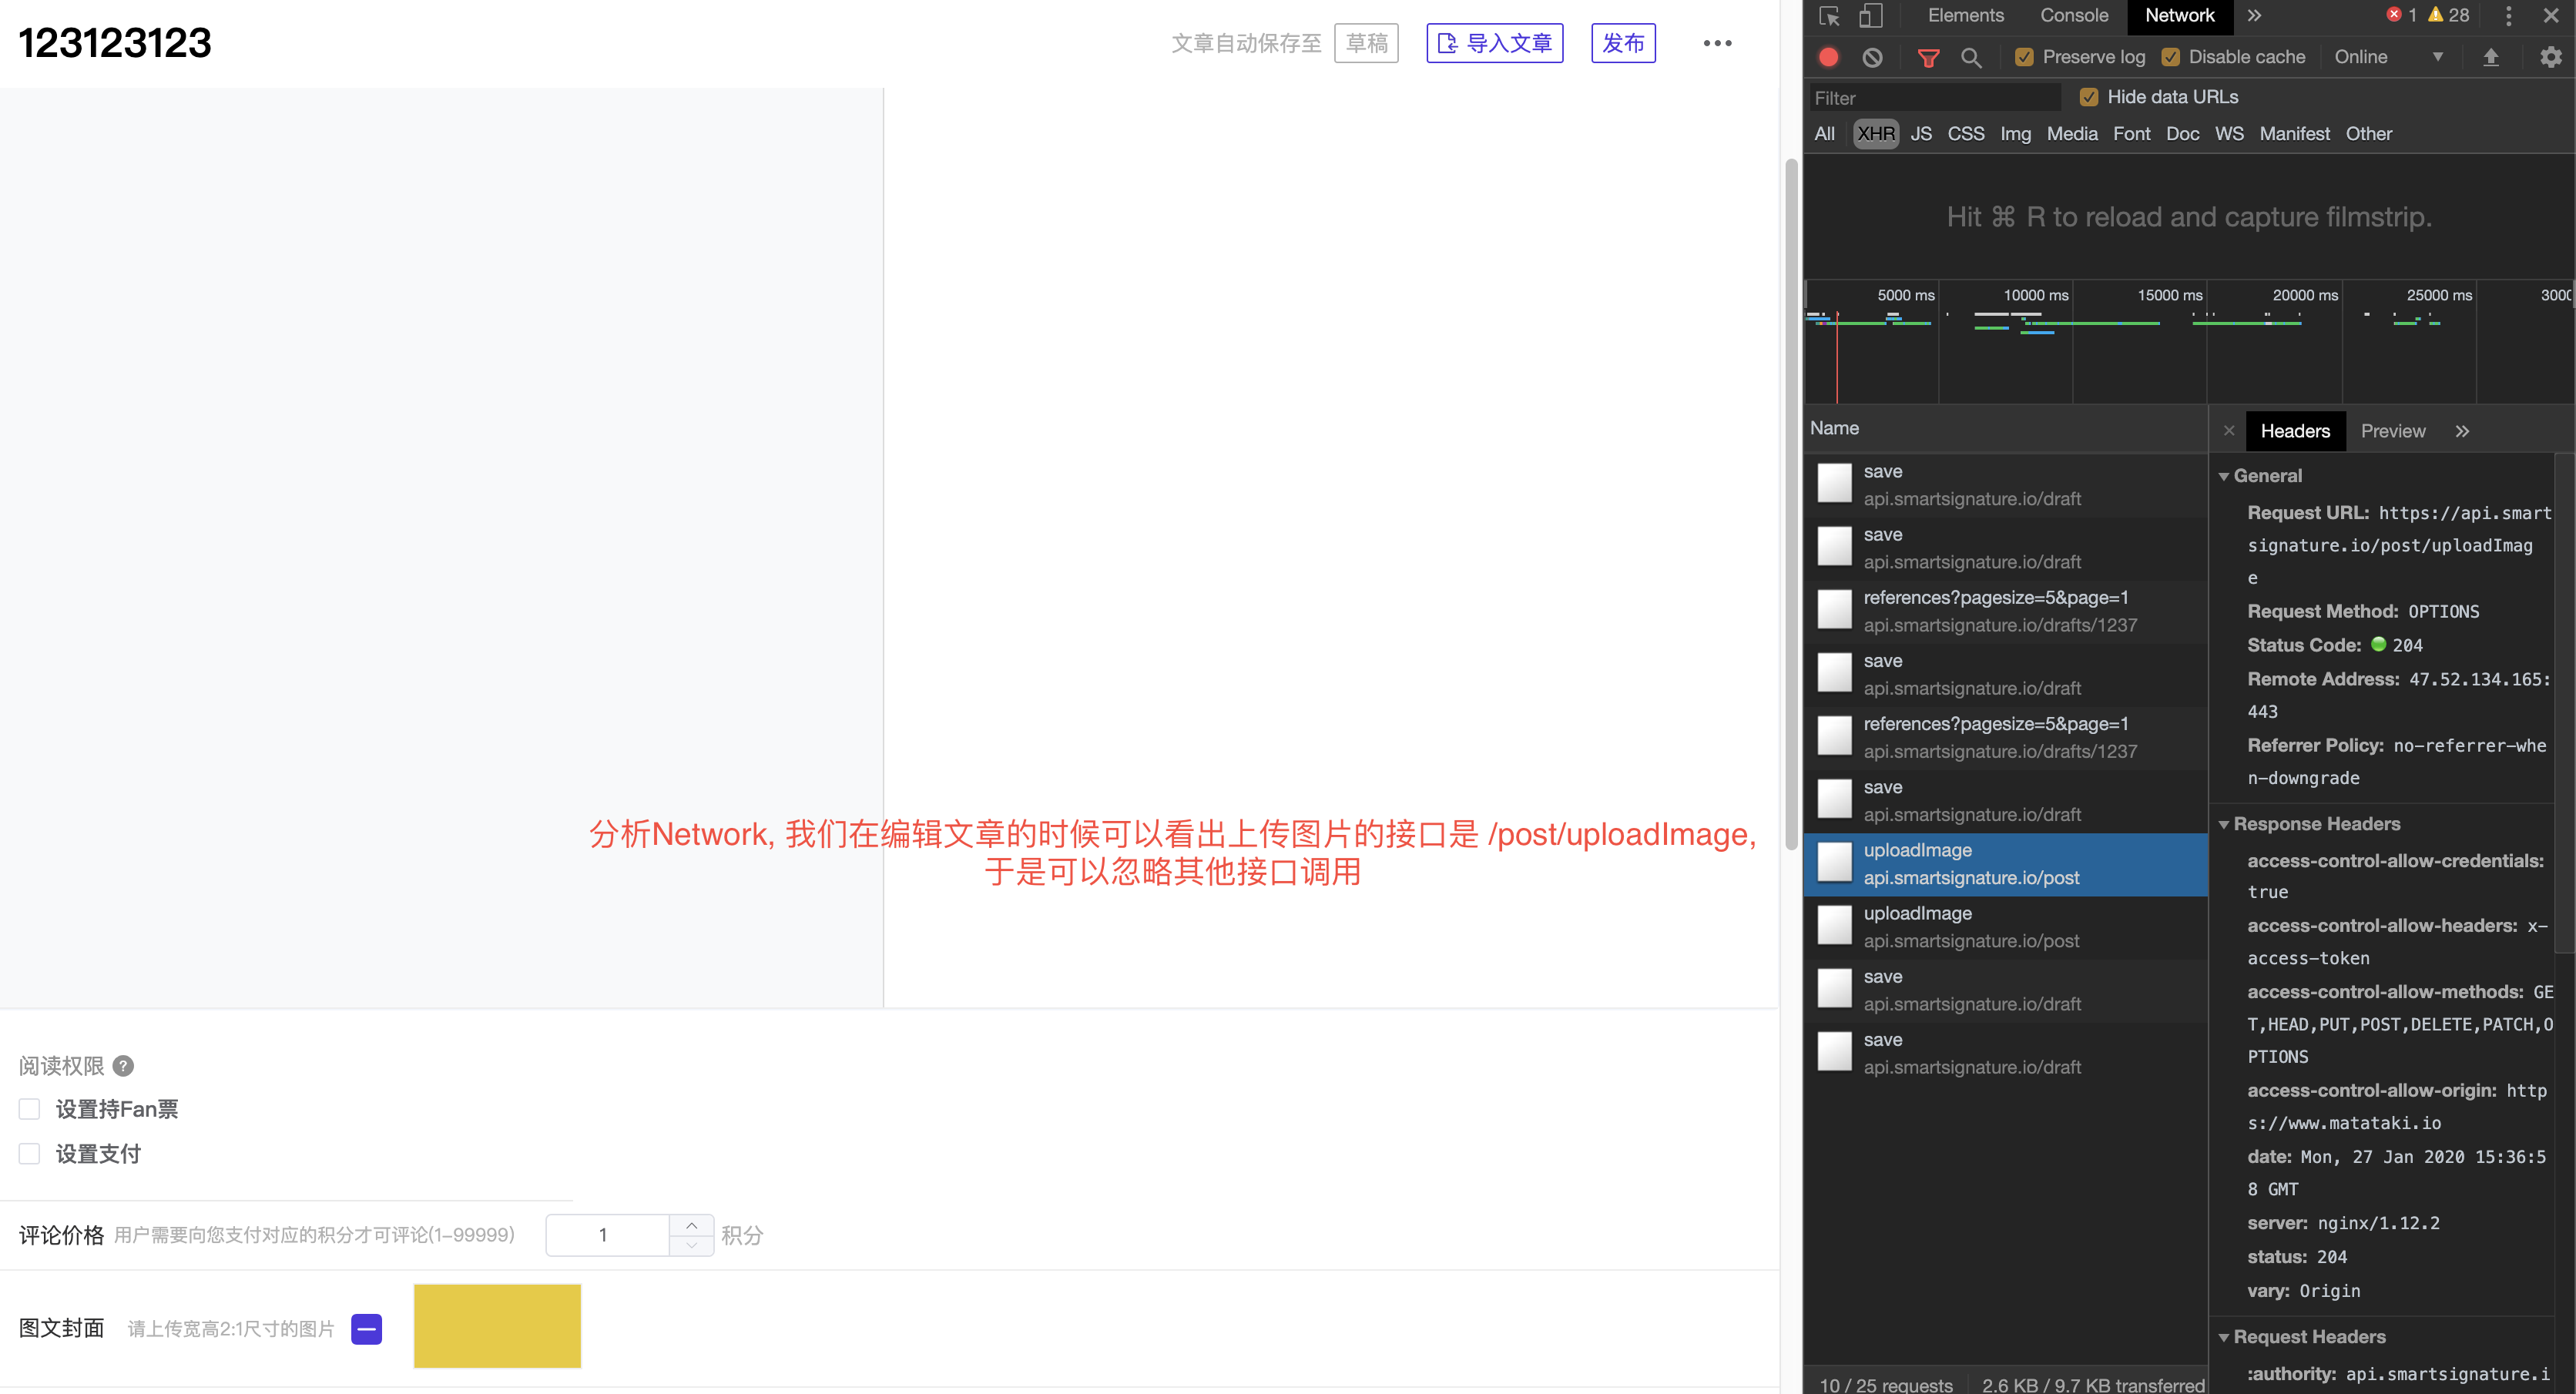
分析Networ
编辑: 我们在编辑文章的时候可以看出上传图片调用接口是 /post/uploadImage, 于是我们可以忽略其他接口调用
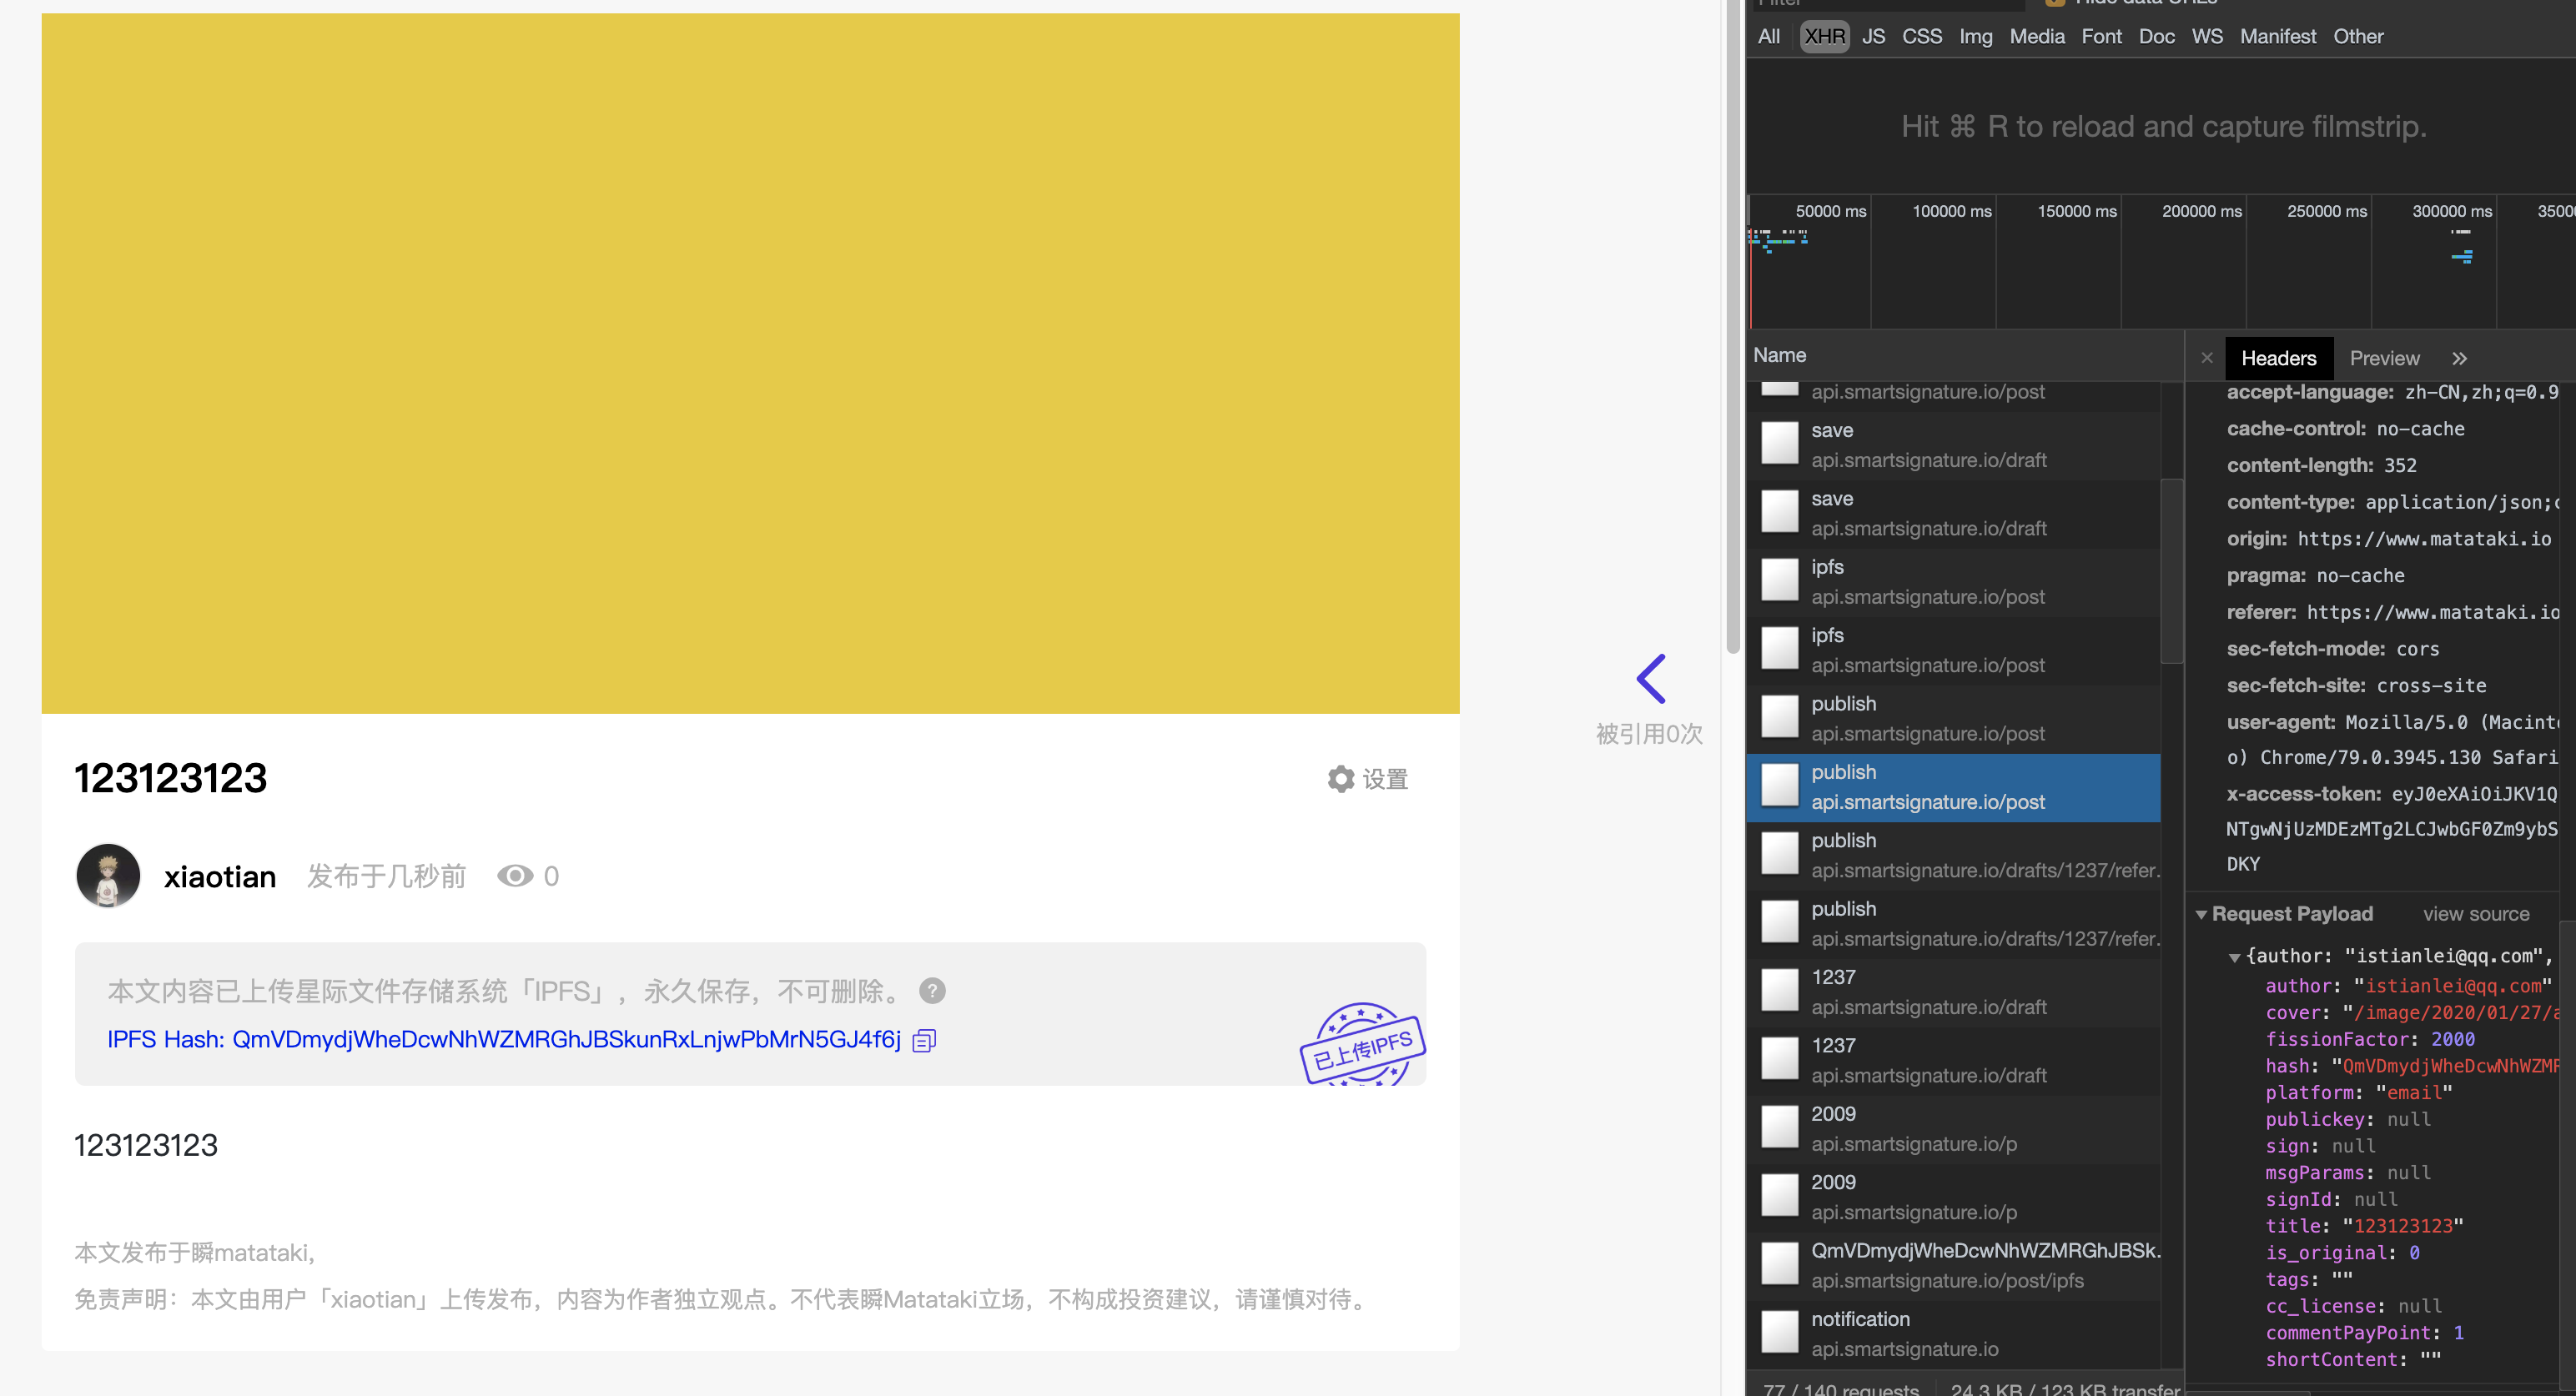
发布: 发布的时候, 可以看出我们一共调用了两个核心的接口, 一个是ipfs上传, 一个是文章上传
思路
1 | // 1、获取内容 |
获取网页内容并解析dom
因为我的blog是静态页面 所以用superagent就可以抓取到内容了, 如果是客户端渲染抓去内容可能有问题, 可以考虑用puppetter做爬虫, 然后用cheerio来解析dom 回味jq, 请求用axios因为做前端习惯了🍑
1
npm i superagent cheerio axios
1
2
3
4
5
6
7
8
9
10
11
12
13
14
15
16
17
18
19
20
21
22
23
24
25
26
27
28
29
30
31
32
33
34
35
36
37
38
39
40
41
42const superagent = require("superagent");
const cheerio = require("cheerio");
const axios = require("axios");
// ...
// 获取内容
const getHtml = async url => {
try {
// 根据url获取内容
const res = await superagent.get(url);
return res.text;
} catch (err) {
console.error(err);
return false;
}
};
// 拆dom 这块根据自己页面自定义
const getDom = html => {
if (!html) return false; // 没html返回
const $ = cheerio.load(html);
// 我的标题
let title = $("#main #posts .post-header .post-title");
// 描述
let desc = $("#main #posts .post-body").text();
// 内容
let content = $("#main #posts .post-body").html();
// 文章封面
let cover = $("#main #posts .post-body img");
// 如果有标题
let titleRes = title.length >= 1 ? $(title[0]).text() : "";
// 如果有图片
let coverRes = cover.length >= 1 ? $(cover[0]).attr("src") : "";
// 把数据返回出去
return {
title: titleRes,
desc,
content,
cover: coverRes
};
};这块还是挺简单的233
~1
2
3
4# 然后我们可以调用方法 启动
node index
# 如果不出意外的话, 数据就能正常返回了 懒得截图了发布文章
首先我们需要一些平台需要的信息,
- TOKEN, 可以去控制台的Cookies里面寻找, 找到一个key为 ACCESS_TOKEN 然后复制信息
- URL 就是需要转发的文章
- AUTHOR是你这个账号在平台的用户名
- PLATFORM 是你这个账号的类型, 比如我是邮箱账号 我就是为 email
1
2
3
4const TOKEN = ""; // 身份证明
const URL = ""; // 需要发的文章
const AUTHOR = ""; // 用户名
const PLATFORM = "email"; // 账号类型 邮箱账号然后我们需要一个config文件 我也这种做法对不对 反正能用🍑 如果你觉得直接写在index.js要方便 可以简化这步
1
2
3
4
5
6
7
8
9
10
11
12
13
14
15
16
17
18
19// config.js
module.exports = {
// 接口地址
api: {
development: "",
production: "https://api.smartsignature.io"
},
// 页面地址
webUrl: {
development: "",
production: "https://www.matataki.io"
}
}
// index.js
const config = require('./config') // config
const mode = process.env.NODE_ENV || 'production'; // 模式
const API = config.api[mode]; // 接口
const webUrl = config.webUrl[mode]; // 页面地址增加两个命令 dev start 来区分 development 和 production
1
2
3
4
5"scripts": {
"test": "echo \"Error: no test specified\" && exit 1",
"dev": "NODE_ENV=development node index",
"start": "NODE_ENV=production node index"
},把内容发布到ipfs
1
2
3
4
5
6
7
8
9
10
11
12
13
14
15
16
17
18
19
20
21
22
23
24
25
26
27
28
29
30
31
32
33
34
35
36
37
38
39
40
41
42
43
44const qs = require("qs");
// ...
console.log('开始获取Html...');
let resHtml = await getHtml(URL);
console.log('获取Dom...');
let resDom = await getDom(resHtml);
let data = {
title: resDom.title.trim(),
author: AUTHOR,
desc: resDom.desc.trim(),
content: resDom.content.trim()
};
data.desc = data.desc.replace(/[\r\n]/g, ""); // 去除回撤换行
data.content = data.content.replace(/[\r\n]/g, ""); // 去除回撤换行
let hash = await postIpfs(data);
if (!hash) return console.log("not hash", hash);
// 发布到ipfs
const postIpfs = async ({ title, author, desc, content }) => {
try {
if (!TOKEN) throw new Error("没有token");
const stringifyData = qs.stringify({
"data[title]": title,
"data[author]": author,
"data[desc]": desc,
"data[content]": content
});
let res = await axios({
method: "post",
url: `${API}/post/ipfs`,
data: stringifyData,
headers: { "x-access-token": TOKEN }
});
// console.log(res.data);
if (res.status === 200 && res.data.code === 0) {
return res.data.hash;
} else return false;
} catch (error) {
console.log(error);
return false;
}
};需要的 x-access-token 已经在前面定义过了, 成功请求后会返回hash地址
然后转存图片
下载图片这块, 按照search到的code没有修改, 使用request请求图片, 并且写入文件, 当然我也发现一个不错的第三方库, image-downloader 这个可以很轻松的下载图片
1
2
3
4
5
6
7
8
9
10
11
12
13
14
15
16
17
18
19
20
21
22
23
24
25
26
27
28
29
30
31
32
33
34
35
36
37
38
39
40
41
42
43
44
45
46
47
48
49
50
51
52
53
54
55
56
57const FormData = require('form-data');
const fs = require('fs')
const request = require('request')
const path = require('path')
// ...
// 图片转存
const downloadImage = async url => {
if (!url) {
console.log('没有url地址')
return false
}
// https://github.com/Kerminate/douban-movies/blob/9119c276b2785b329f62cca684bc6d6459a7c57e/server/tasks/smms.js
// 下载图片
const downResources = (url, imgPath) => {
return new Promise((resolve, reject) => {
request
.get(url)
.pipe(fs.createWriteStream(imgPath))
.on('finish', () => {
resolve()
})
})
}
const fileName = 'photo.png'
const imgPath = path.resolve(__dirname, './photo.jpg')
try {
await downResources(url, imgPath)
// fix Callback must be a function
const buffer = await fs.readFileSync(imgPath)
const base64Image = Buffer.from(buffer).toString('base64')
const form = new FormData()
form.append('smfile', Buffer.from(base64Image, 'base64'), {
filename: fileName
})
let headers = form.getHeaders()
headers['x-access-token'] = TOKEN
const res = await axios({
method: 'POST',
url: `${API}/post/uploadImage`,
headers: headers,
data: form
})
// console.log(res.data)
if (res.status === 200 && res.data.code === 0) {
return res.data.data.cover
} else {
console.log('fail, status: ', res.status)
return false
}
} catch (err) {
console.log('update error', err)
return false
}
};图片上传的核心我是从github里面search的
1
2
3
4
5
6
7
8
9// ...
// 这里的一些转换我没有弄明白, 前端一般直接一个file或者一个blob就上去了
// 在node里面这个Buffer我还没有理解 希望大佬们看到了能教我一手👋!!!
const base64Image = Buffer.from(buffer).toString('base64')
const form = new FormData()
form.append('smfile', Buffer.from(base64Image, 'base64'), {
filename: fileName
})
// ...上传成功后会返回一个url地址, 如果是smms之类的图床上传记得多写一些判断他会判断重复的图片
图片也有了之后就是上传文章了
1
2
3
4
5
6
7
8
9
10
11
12
13
14
15
16
17
18
19
20
21
22
23
24
25
26
27
28
29
30
31
32
33
34
35
36
37
38
39
40
41
42
43
44
45
46// 发布文章
const post = async data => {
try {
let res = await axios({
method: "post",
url: `${API}/post/publish`,
data: data,
headers: { "x-access-token": TOKEN }
});
// console.log(data, res.data);
if (res.status === 200 && res.data.code === 0) {
return res.data;
} else {
console.log('fail', res.data)
return false;
}
} catch (error) {
console.log('error', error)
return false;
}
};
console.log('发送到Matataki...');
// 大部分的参数按照我这个默认就好了
let resPost = await post({
author: AUTHOR,
cover,
fissionFactor: 2000,
hash: hash,
platform: PLATFORM,
publickey: null,
sign: null,
msgParams: null,
signId: null,
title: resDom.title,
is_original: 0,
tags: "",
cc_license: null,
commentPayPoint: 1,
shortContent: ""
});
if (resPost) {
console.log(`发送成功, 您的文章地址: ${webUrl}/p/${resPost.data}`)
} else {
console.log('发送失败!!!')
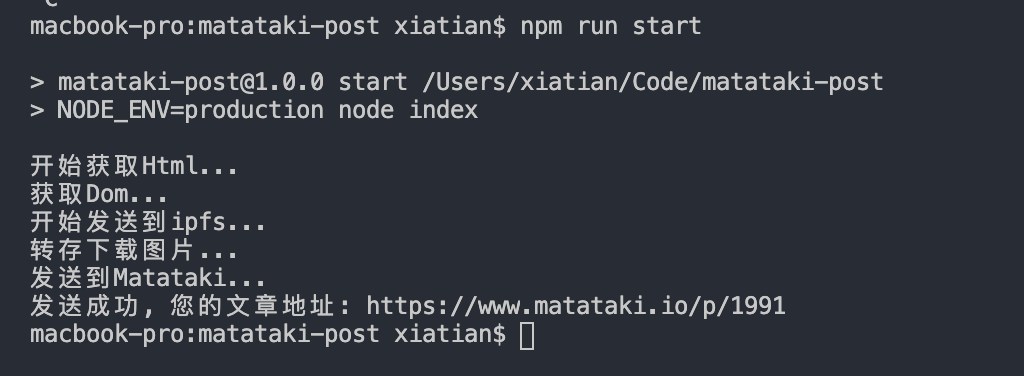
}成功后会返回一个文章id然后我们去访问
console.log(`发送成功, 您的文章地址: ${webUrl}/p/${resPost.data}`)
到此流程就完全结束了!!! 归纳调用
1 | // 开始 |
调用结果 看起来还不错🍑
由于这是一个简单的example 所以不会弄得太复杂 简单的爬虫加上调用接口即可。
因为不太会node 全完自己瞎鼓捣, 如果写的不对或者不好的地方希望大佬们多多指点 指点
也欢迎加入QQ Group ID:718639024 来吐槽我🤮🤮🤮